___
How to Disable the Home Network Defender service in LELA
Many of the most current Linksys/Cisco routers come with the Linksys EasyLink Advisor software. Within this software is an option to activate the Home Network Defender (HND) service (that offers safe web surfing and parental control when accessing the internet).
However, many people including myself do not need or want this level of control. I have noticed on the web that many would like to know how to disable this service. This blog posting describes in some detail how to disable HND through the Linksys Easylink Advisor software.
First, we will start with describing HND.
HND Definition
Home Network Defender (HND) powered by Trend Micro is designed to protect you and your family against cybercriminals and online predators by stopping threats before they get into your home network.
The Linksys by Cisco router with HND provides a blanket of protection for your entire home network. HND provides a first line of defense by stopping web threats at the router layer. HND comes with two options for protection:
Safe Web Surfing is designed to keep you and your family from being directed to malicious content or masquerading web pages that may steal your personal information.
A Parental Control management console helps ensure that family members view only appropriate content.
HND also includes a comprehensive reporting feature so you know what content is being viewed by whom.
Linksys by Cisco Router:
I am using a WRT310N linksys router with LELA version 3.11 install on my PC system.
Steps to Disabling HND
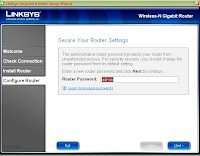
1. Open the LELA software. [Click on image to enlarge]
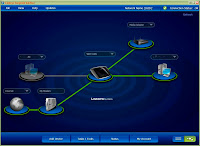
2. Next, click on the Tasks/Tools button at the bottom of the LELA window. [Click on image to enlarge]
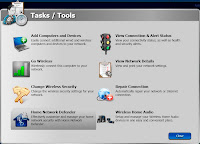
3. Next, click on the Home Network Defender button. [Click on image to enlarge]
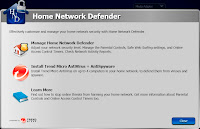
4. Now, click on the Manage Home Network Defender button. [Click on image to enlarge]
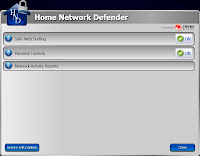
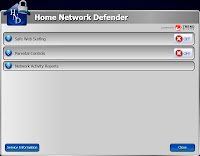
5. Finally, click on each of the On switch buttons to the right of both Safe Web Surfing and Parental Controls. By clicking on the buttons, it will change their status to Off. [Click on image to enlarge]
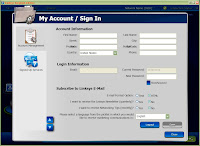
Note: If you haven't previously setup login information in the My Account of LELA, then you will be required to provide a valid email address and new password when changing the On/Off switches. [You can click on the My Account button of the main LELA window to see your current login information]. [Click on image to enlarge]
___
Friday, November 20, 2009
Thursday, October 22, 2009
HowTo: Setting-Up a Linksys Wireless-N Router with Cable Internet Service...
___
Most cable ISPs use a MAC Authentication to establish Internet connections for end-users. A Media Access Control (MAC) address is assigned a unique 48-bit (6-byte) integer that is attached to an Ethernet NIC for each computer. To set-up your Linksys router to a Cable ISP, you have to do MAC Cloning. MAC Cloning is a procedure which enables a router to copy the MAC address of the PC that's registered with the ISP.
To setup a Linksys router with Cable connection you need to perform five steps:
1. Verifying Internet Connection
2. Connecting Devices Together
3. Checking the Router's LEDs
4. Configuring a Linksys Router for a Cable Connection
5. Power Cycling
Note: Before proceeding, use the computer that can go online when connected to the modem and follow the steps below.
1. Verifying Internet Connection
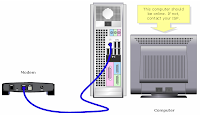
Connect the Broadband modem to the computer using an Ethernet cable without the router installed and make sure that the Internet connection is active. If it is not, contact your Internet Service Provider (ISP). If it can go online, the PC connected to the modem is the one that's registered with the ISP. After verifying the Internet connection, proceed in connecting the devices together.
Note: The image may vary depending on the computer and modem you're using.
2. Connecting the Devices Together
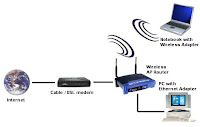
After ensuring that you have an active Internet connection, connect the modem to the router's Internet port and the computer to any of the four Ethernet ports.
After connecting the devices together, proceed in checking the router's LEDs. For instructions, follow the steps below.
3. Checking the LEDs
After connecting your modem and PC to the router, check the lights on the front panel of the router.
After checking the router's LEDs, proceed in setting-up the Linksys router for cable connection.
4. Configuring a Linksys Router for a Cable Connection
Step 1: Open a web browser such as Internet Explorer.
Step 2:Go to the Address bar and enter your router’s IP address ("192.168.1.1" is the default IP of most Linksys routers) then press [Enter].
Step 3: A new window will prompt for a User name and Password. Leave the User name field blank then enter your router’s password ("admin" is the default password), then click OK.
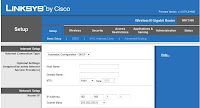
Step 4: When the router's web-based setup page appears, look for Internet Connection Type and make sure it is set to Automatic Configuration - DHCP.
Step 3: Click on Save Settings.
Step 4: Click MAC Address Clone then select Enabled.
Step 5: Click on Clone My PC's MAC.
Step 6: Click on Save Settings.
Step 7: Click on Status Tab.
Step 8: Check the value of the IP Address. If the IP Address has numbers, this means the router has been properly configured. You should now be able to access the Internet. If you're not online, perform a power cycle to synchronize the router with the modem.
Note: If the IP Address is all zeroes (0.0.0.0) perform a power cycle. After configuring the router for cable connection and you're still having difficulties getting online, proceed in performing a power cycle.
5. Power Cycling
Step 1:
Shutdown the computer.
Step 2:
Unplug the router's power cable.
Step 3:
Unplug the Broadband modem's power cable and wait for 30 seconds.
Step 4:
Plug in the Broadband modem's power cable and wait for its lights to appear stable.
Step 5:
Plug in the router's power cable once the modem's lights appear stable.
Step 6:
Power on the computer on and test the Internet connection.
Note: If you're not online after performing this procedure, you may need to upgrade the firmware of the router.
___
Wednesday, September 30, 2009
HowTo: Wireless Router Setup (Part 1/2)...
___
In this blog post, I am going to describe the setup and installation of my wireless router as part of my home network. The description will be in two parts. First, the setup and installation of the router to my desktop PC and second, the setup of my laptop as a client of the wireless network.
My Hardware Setup:
The How To Setup will be specific to the following hardware, but it will give you a general guideline to setting up a wireless router as part of your home network.
Wireless Router: Linksys WRT310N (N-Gigabit Wireless Router)
Desktop PC: Custom built PC with system running Windows XP Service Pack 3
Laptop: Compaq Presario CQ50-115NR Notebook PC (running Windows Vista 32-bit)
DSL Modem: Verizon DSL Modem (already connected directly to the Desktop PC)
Cables: Two Cat 5 cables (one already used by the modem and the other one that comes in the box with the Linksys wireless router).
LinkSys Router Setup
Physical Setup of a LinkSys Router
Each model of router will differ slightly, but the general design is similar across all models. Therefore, the setup is similar across all models.
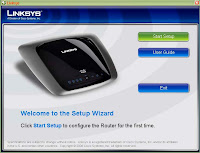
First, insert the Setup Wizard CD (that came with the router) into the CD drive of the Desktop.
The setup screen below will then appear on the desktop. [Click on Image to Enlarge]
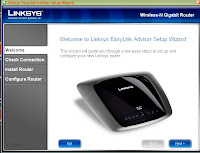
Step 1: Click on the Start Setup Button to proceed and the next setup window below will appear. [Click on Image to Enlarge]
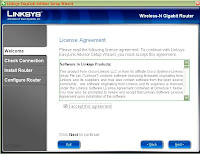
Step 2: Click on the Next button to proceed to the License Agreement Window (as shown below [Click Image to Enlarge]). Accept the Agreement and click Next to continue with the setup.
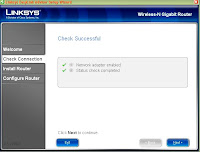
Step 3: The Setup wizard will check your connections and display the widow below. Click Next.
Step 4: The Setup Wizard may display a series of screens that will walk you through the Router's physical installation. Follow the instructions on these screens:
a) Unplug the power cord from the DSL modem.
b) Unplug the ethernet cable from the desktop PC ethernet Port and plug the cable into the port labelled "Internet".
c) Plug the other Ethernet cable into one of the available ports on the router.
d) Plug the other end of that same cable into an Ethernet port on your PC.
e) Reconnect the power cord to the DSL modem.
f) Wait approx. 30 seconds for the DSL modem to power up before continuing.
g) Next, connect power to the linksys router and waiting approx. 60 seconds before continuing.
Step 5: When the Configuration Complete screen appears, click Next.
LinkSys Router Configuration
LinkSys routers now ship with a Setup Wizard which is intended to simplfy basic configuration tasks.
Step 6: The remaining configuration screens (starting with the one below) may ask you to change some of the router settings. Follow the instructions in these remaining screens until you see the Network Configured Screen. Click the Next button to close the setup wizard.
Note: At this point, the setup should be successfully completed.
Click on the web browser, to verify that you can connect to the internet okay.
In my setup, I logged into my router to change some configuation options. This is not a required step. The LinkSys router ships with default settings that enable it to work right out of the box in most environments.
Logging in to a LinkSys Router
Once your web browser is open, go to the URL http://192.168.1.1/. This will take you to a popup box which asks you to enter a username and password.
The username is either blank or "admin" and the default password is "admin". Note, you may have already changed this to something else during the Wizard Setup.
Once you are past the login screen, you are able to access (and change) a plethora of configuration options for your router. From here the configuration options that you choose are largely up to your own personal preference.
Since this is a wireless router, it is recommended to change the setting for the SSID to identify the router as your own and configuring WAP2 to encrypt your wireless traffic. Again, this will part of your own preferences.
In part two of this posting, I am going to describe the general setup of a laptop for the wireless connection to my home network.
Part 2/2>>
___
Tech Posts on My Laptop PC...
Hello!
This blog site was setup to posts technical issues and discussions on laptop/PC software and hardware.
___
This blog site was setup to posts technical issues and discussions on laptop/PC software and hardware.
___
Subscribe to:
Posts (Atom)