IntroductionProblems with the backlight on your laptop is one of the most common laptop problems. In most cases the LCD display inverter is the cause of the problem.
Here are some LCD screen backlight failure symptoms that could be related to a bad inverter board:
- Laptop boots as usual but after some time the screen blacks out. You still can see an image on the screen but it’s very dim. You might even use a flashlight to see it better. Sometimes the backlight comes back for a while but then goes off again. In some cases you can turn the backlight on if you tap rapidly on the lid close switch.
- The screen always stay black and the backlight never comes on but you still can make out an image on the LCD. It’s dark, but the image is still there.
-In some cases you might hear a buzzing noise coming from the area where the inverter board is located, it’s on the bottom part of the display assembly.
NOTE: if you cannot see an image on the screen, most likely you have a different problem and there is nothing wrong with the display inverter.
In this posting, I describe an example of replacing the display inverter board on an HP Pavilion laptop. This guide will work fine for any other HP laptop. Replacing a display inverter on other laptops like Dell, Toshiba, IBM, etc… will not be much different.
System InformationThe laptop that I replaced the display inverter is a HP Pavilion dv5-1002nr, running Windows Vista Home Premium Edition (32-bit). [As shown above.]
Display Description15.4-inch WXGA Brightview display assembly [HP Spare Part Number: 484367-001]
Preliminary replacement requirementsThe following sections include some of the considerations that you must keep in mind during disassembly and assembly procedures.
Tools requiredYou will need the following tools to complete the removal and replacement procedures:
● Magnetic screwdriver
● Phillips P0 and P1 screwdrivers
● Flat-bladed screwdriver
Service considerationsNOTE: As you remove each subassembly from the computer, place the subassembly (and all accompanying screws) away from the work area to prevent damage.
Cables and connectorsCAUTION: When servicing the computer, be sure that cables are placed in their proper locations during the reassembly process. Improper cable placement can damage the computer.
Preliminary Safety InstructionsBefore locating, removing and replacing LCD inverter, follow these steps:
1. Shut down the computer. If you are unsure whether the computer is off or in Hibernation, turn the laptop on, and then shut it down through the operating system.
2. Disconnect all external devices connected to the computer.
3. Disconnect the power from the computer by first unplugging the power cord from the AC outlet and then unplugging the AC adapter from the computer.
4. Remove the battery.
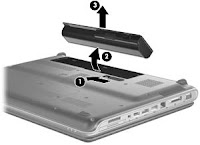 Figure 1
a) Turn the computer upside down on a flat surface. [See Figure 1 above.]
b) Slide the battery release latch
(1) to release the battery.
c) Pivot the battery
(2) upward and remove it
(3) from the computer.
d) To insert the battery, insert the rear edge of the battery into the battery bay and pivot the front edge of the battery downward until it is seated. The battery release latch automatically locks the battery into place.
LCD Inverter Replacement Steps1. Remove the Switch Cover.
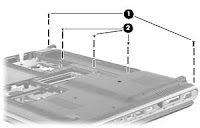 Figure 2
a) Position the computer with the front toward you.
b) Remove the following screws [See Figure 2 above.]:
(1) Two Phillips PM2.5×7.0 screws that secure the switch cover to the computer
(2) Three Phillips PM2.0×4.0 screws that secure the switch cover to the computer.
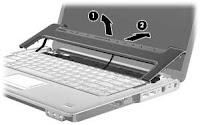 Figure 3
d) Open the computer as far as possible. [See Figure 3 above.]
e) Lift the rear edge of the switch cover
(1) until it detaches from the computer.
f) Slide the switch cover
(2) back until it rests on the display.
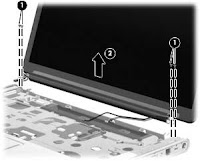 Figure 42.
 Releasing the display assembly from the laptop. [See Figure 4 above.]
a) First, the switch cover should be positioned as far from the display assembly as allowed by the cables connected to the switch cover. This will allow access to screws connecting the display assembly to the laptop.
b) Remove the four Phillips PM2.5×7.0 screws
(1) that secure the display assembly to the laptop.
c) Lift the display assembly as far away from the laptop as possibly allowed by the display cables
(2).
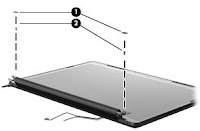 Figure 53.
 Removing the Display Bezel.
a) Remove the following screw covers and screws [See Figure 5 above]:
- Two rubber screw covers on the display bezel bottom edge
(1).
- Two Phillips PM2.5×7.0 screws
(2).
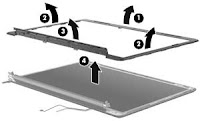 Figure 6
 b) Flex the inside edges of the top edge
(1), the left and right sides
(2), and the bottom edge of the display bezel
(3) until the bezel disengages from the display enclosure. Remove the display bezel
(4). [The display bezel is available using the HP Spare Part Number 486532-001.]
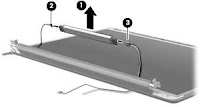 Figure 74.
 Replacing the display inverter. [See Figure 7 above.]
a) If it is necessary to replace the display inverter, release the display inverter
(1) as far from the display enclosure as far as the display panel cable and backlight cable allow.
b) Disconnect the display panel cable
(2) and the backlight cable
(3) from the display inverter.
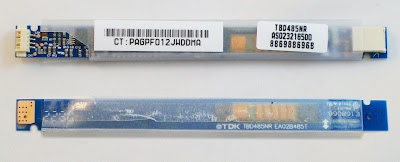
c) Remove the display inverter. [The display inverter is available from HP using Spare Part Number 488317-001.]
Below is a picture of the replacement display inverter. The image shows both sides of inverter.
 5.
5. Inserting the new LCD inverter.
a) Connect the display panel cable and the backlight cable to the display inverter.
b) Reverse steps 1-4 above in order to complete the inverter replacement.
c) As a final step, connect the battery and power cables to the laptop and power up the laptop.
Note: If all the steps were successful, then the LCD display should now be functioning correctly.
___