The performance of your laptop can be affected by dust and dirt. General maintenance can prolong the life of your equipment and help ensure the contents of your laptop won't get lost as a result of a computer crash.
Regular cleaning the laptop can help prevent such occurrences and keep your computer clean and dust free! This in turn can minimize the possiblity of your laptop overheating. Overheating is a common complaint among laptop users. The two most likely causes of overheating:
1. Dust in the laptop is making the cooling system less efficient than it originally was.
2. Heat-sink thermal paste/pad not applied correctly.
In this post, we focus on option 1 above and we take a look at cleaning the vents of a HP dv5 1002nr laptop.
Note: It is not a good idea to use your laptop on soft surfaces such as beds, pillows, carpeting, sofas, or even your lap. This blocks air intake and exhaust vents.
STEPS TO FOLLOW:
1. Items needed:
a. Compressed air can (e.g. Falcon Dust-Off XL)
b. toothpick
2. Power down laptop.
3. While keeping the can upright, apply a few quick bursts of air to the vents of the laptop.
4. Us the toothpick to hold the fan from spinning and again, apply a few bursts of air to the vent holes of the CPU fan.
___
Friday, July 30, 2010
Tuesday, July 27, 2010
A-How-To: Checking Your Wireless Network for Outside Users...
Intro
Wireless security is very important these days. You don't want anyone stealing your bandwidth or getting into your network to perform malicious attacks on your computer. This is a guide to help you know when someone else is on your wireless network. Since every wireless router is different, this article will discuss the basics and use one of the most popular wireless routers, the Linksys WRT310N as an example. The steps for your router may differ. This guide assumes you are connected to your router (either through a network cable or over its wireless signal) correctly.
Note: First, get a pen and paper, and create a list of all computers/devices that use wifi/wireless in your home or that will be using it and write them down.
Steps
1. Open your web browser and input your default gateway's IP address. To find this:
Go to Start > run, and type cmdType ipconfig and press enter. It will list the default gateway here. Once you have your default gateway address, open your web browser and type it in the URL bar [See figure below].
2. Input your router's username and password in the pop-up login window [See figure below].
3. Click on the "Status" tab and then on "Local Network" just below the main tabs [See figure below].
4. Click the button that says "DHCP Clients Table". This list will tell you the computer name of everyone connected to your network on DHCP (DHCP automatically configures a computer's IP and DNS settings. This only works if everyone connected uses DHCP. If someone connects and uses their own static address, then this will not show them.) [See figure below]
5. You may also check the router's log file to see what users are going through the router. (Note: From the Router's user interface you will probably have a setting to log Users enable it if not already).
6. Click on the main "Administration" tab and then "Log" just below the main tabs [See figure above].
7. Click on the "View Log" button to bring up a window that will display log entries [See figure below].
From time to time check the log to see if any unknown client names or addresses show up. If so, then someone is leeching off your internet connection, through your wireless router.
Note: There are tons of web pages that provide content on how to make your wireless router more secure.
Note: There are tons of web pages that provide content on how to make your wireless router more secure.
___
Sunday, July 25, 2010
New Website Launch: www.eiffel19sware.com...
This blogger has launch a new business website.
Website Description:
Eiffel19 EntreSoft provides information technology consulting and computer services to small businesses, organizations and individual/home users. In addition, we provide software development contracting services. Although we are located in the Boston area, most of our services are available to clients throughout the United States.
We are always available for a FREE consultation to discuss your computer issue or software project. Please visit our website for more detailed information.
___
Friday, July 23, 2010
A-How-To: System File Checker (SFC) to fix Corrupted Files in Windows XP/Vista/7...
System File Checker (SFC) - scannow
SFC gives an administrator the ability to scan all protected files to verify their versions and it will attempt to replace missing or corrupted system files by proper versions if it can locate a valid copy on your hard disk. If it cannot find a copy on your hard disk it will ask you to insert your Windows XP CD. You must have a valid copy of your Windows service pack (SP) revision level for this to work properly.
The /scannow option scans all protected system files immediately and replaces incorrect versions with correct Microsoft versions. This command may require access to the Windows installation source files.
How to run SFC with the scannow option
Click Start > Run and type sfc /scannow and the click OK.
Note the space between the c and the /
You may need your Windows XP CD so have it ready.
If you have Service Pack 2 (SP2) or SP3 installed, you will need the SP2 or SP3 version of the version of the CD. This can be done with a borrowed CD, if you don't have one.
Allow the scan to run and when completed, reboot the system.
___
Wednesday, July 7, 2010
A-LPC-to-Note: Hard Disk Drive Failure and Symptoms...
Hard Disk Failure and Symptoms
A hard disk drive (HDD) failure occurs when a hard disk drive malfunctions and the stored information cannot be accessed with a properly configured computer. A disk failure may occur in the course of normal operation, or due to an external factor such as exposure to fire or water or high magnetic waves, or suffering a sharp impact, which can lead to a head crash.
The severity of disk failures vary. Typically, a hard disk can fail in four ways that will lead to a potential loss of data:
1. Logical Corruption
2. Firmware Corruption/Damage to the firmware zone
3. Electronic Failure
4. Mechanical Failure
Combinations of these four types of failure are also possible. Over time, all hard disks will develop bad sectors which can lead to data loss and drive inaccessibility.
The data on the hard disk maybe recoverable, but depends on exactly what happened to the disk.
Logical Errors
Often the easiest and the most difficult problems to deal with, logical errors can range from simple things such as an invalid entry in a file allocation table to truly horrific problems such as the corruption and loss of the file system on a severely fragmented drive.
Logical errors are different to the electrical and mechanical problems (described below) as there is usually nothing physically wrong with the disk, just the information on it.
Firmware Failure
Hard disk firmware is the software code that controls, and is embedded in, the physical hard drive hardware. If the firmware of a hard disk becomes corrupted or unreadable the computer is often unable to correctly interact with the hard disk. Frequently the data on the disk is fully recoverable once the drive has been repaired and reprogrammed.
Common Firmware failures Symptoms:
• The hard disk will spin up when powered on, but be incorrectly recognized or not recognized at all by the computer.
• The hard disk will spin up & be recognised correctly by the computer but the system will then hang during the boot process.
Electronic Failure
Electronic failure usually relates to problems on the controller board of the actual hard disk. The computer may suffer a power spike or electrical surge that knocks out the controller board on the hard disk making it undetectable to the BIOS.
Common Electrical failures Symptoms
• The hard disk will not spin up when the drive is powered on - it will appear dead and not be recognized by the computer.
Mechanical Failure
Mechanical hard disk failures are those which develop on components internal to the hard disk itself. Often as soon as an internal component goes faulty the data on the hard disk will become inaccessible.
Common Mechanical failures Symptoms
• When powered on, the hard drive will immediately begin to make a regular ticking or clicking sound.
___
Tuesday, July 6, 2010
A-How-To: Reapplying Thermal Paste to CPU/Heatsink...
Today’s processors are running quite hot. Advancements are being made to make them run cooler at higher speeds, but the importance of a high quality heat sink and fan cannot be overstated. PCs that are not properly cooled can be quite unstable, or at its worse, it may not even boot properly.
A heatsink and fan are typically used in keeping your CPU cool. A compound is used to seal the gap between the heat sink and the top of the processor. Sometimes, over time the compound may need to be re-applied.
General Steps
=============
General Steps
=============
- Follow your system manual in order to carefully remove the heatsink and fan.
- Clean the top of the processor. Using a lint-free cloth and isopropyl alcohol (or some other non-abrasive cleaning solution), ensure that the surface of the processor is clean and free of dust and finger oil. Do the same to the bottom of the heat sink.
- Apply the heat sink compound over the entire top surface of the processor. It is a good idea to use good quality compound. Arctic Silver is a very popular choice. Be careful not to get compound on any motherboard electronics. Apply only a very small portion to the processor. Only a very thin layer is required. The compound must be spread out evenly across the top of the chip, forming that very thin layer. When spreading the heat sink compound, do not use your finger.
- Follow your system instructions for re-attaching the heat sink. and securing the heat sink.
- No compound should have oozed out from the sides. If it did then you applied too much and need to remove the heatsink fan, clean both the heatsink and CPU and start over.
Wednesday, June 9, 2010
Sunday, February 28, 2010
HowTo: LCD Display Inverter Replacement...
Introduction
Problems with the backlight on your laptop is one of the most common laptop problems. In most cases the LCD display inverter is the cause of the problem.
Here are some LCD screen backlight failure symptoms that could be related to a bad inverter board:
- Laptop boots as usual but after some time the screen blacks out. You still can see an image on the screen but it’s very dim. You might even use a flashlight to see it better. Sometimes the backlight comes back for a while but then goes off again. In some cases you can turn the backlight on if you tap rapidly on the lid close switch.
- The screen always stay black and the backlight never comes on but you still can make out an image on the LCD. It’s dark, but the image is still there.
-In some cases you might hear a buzzing noise coming from the area where the inverter board is located, it’s on the bottom part of the display assembly.
NOTE: if you cannot see an image on the screen, most likely you have a different problem and there is nothing wrong with the display inverter.
In this posting, I describe an example of replacing the display inverter board on an HP Pavilion laptop. This guide will work fine for any other HP laptop. Replacing a display inverter on other laptops like Dell, Toshiba, IBM, etc… will not be much different.
System Information
The laptop that I replaced the display inverter is a HP Pavilion dv5-1002nr, running Windows Vista Home Premium Edition (32-bit). [As shown above.]
Display Description
15.4-inch WXGA Brightview display assembly [HP Spare Part Number: 484367-001]
Preliminary replacement requirements
The following sections include some of the considerations that you must keep in mind during disassembly and assembly procedures.
Tools required
You will need the following tools to complete the removal and replacement procedures:
● Magnetic screwdriver
● Phillips P0 and P1 screwdrivers
● Flat-bladed screwdriver
Service considerations
NOTE: As you remove each subassembly from the computer, place the subassembly (and all accompanying screws) away from the work area to prevent damage.
Cables and connectors
CAUTION: When servicing the computer, be sure that cables are placed in their proper locations during the reassembly process. Improper cable placement can damage the computer.
Preliminary Safety Instructions
Before locating, removing and replacing LCD inverter, follow these steps:
1. Shut down the computer. If you are unsure whether the computer is off or in Hibernation, turn the laptop on, and then shut it down through the operating system.
2. Disconnect all external devices connected to the computer.
3. Disconnect the power from the computer by first unplugging the power cord from the AC outlet and then unplugging the AC adapter from the computer.
4. Remove the battery.
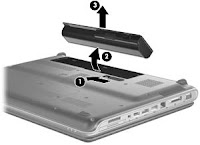 Figure 1
a) Turn the computer upside down on a flat surface. [See Figure 1 above.]
b) Slide the battery release latch (1) to release the battery.
c) Pivot the battery (2) upward and remove it (3) from the computer.
d) To insert the battery, insert the rear edge of the battery into the battery bay and pivot the front edge of the battery downward until it is seated. The battery release latch automatically locks the battery into place.
LCD Inverter Replacement Steps
1. Remove the Switch Cover.
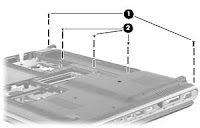 Figure 2
a) Position the computer with the front toward you.
b) Remove the following screws [See Figure 2 above.]:
(1) Two Phillips PM2.5×7.0 screws that secure the switch cover to the computer
(2) Three Phillips PM2.0×4.0 screws that secure the switch cover to the computer.
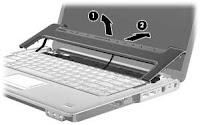 Figure 3
d) Open the computer as far as possible. [See Figure 3 above.]
e) Lift the rear edge of the switch cover (1) until it detaches from the computer.
f) Slide the switch cover (2) back until it rests on the display.
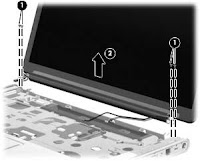 Figure 4
2. Releasing the display assembly from the laptop. [See Figure 4 above.]
a) First, the switch cover should be positioned as far from the display assembly as allowed by the cables connected to the switch cover. This will allow access to screws connecting the display assembly to the laptop.
b) Remove the four Phillips PM2.5×7.0 screws (1) that secure the display assembly to the laptop.
c) Lift the display assembly as far away from the laptop as possibly allowed by the display cables (2).
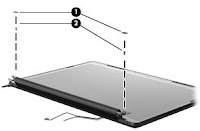 Figure 5
3. Removing the Display Bezel.
a) Remove the following screw covers and screws [See Figure 5 above]:
- Two rubber screw covers on the display bezel bottom edge (1).
- Two Phillips PM2.5×7.0 screws (2).
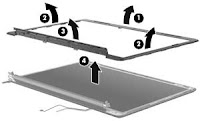 Figure 6
b) Flex the inside edges of the top edge (1), the left and right sides (2), and the bottom edge of the display bezel (3) until the bezel disengages from the display enclosure. Remove the display bezel (4). [The display bezel is available using the HP Spare Part Number 486532-001.]
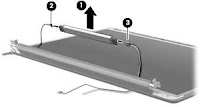 Figure 7
4. Replacing the display inverter. [See Figure 7 above.]
a) If it is necessary to replace the display inverter, release the display inverter (1) as far from the display enclosure as far as the display panel cable and backlight cable allow.
b) Disconnect the display panel cable (2) and the backlight cable (3) from the display inverter.
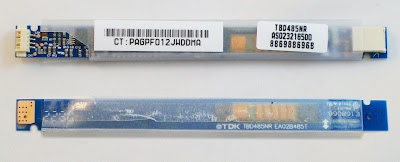
c) Remove the display inverter. [The display inverter is available from HP using Spare Part Number 488317-001.]
Below is a picture of the replacement display inverter. The image shows both sides of inverter.
5. Inserting the new LCD inverter.
a) Connect the display panel cable and the backlight cable to the display inverter.
b) Reverse steps 1-4 above in order to complete the inverter replacement.
c) As a final step, connect the battery and power cables to the laptop and power up the laptop.
Note: If all the steps were successful, then the LCD display should now be functioning correctly.
___
Problems with the backlight on your laptop is one of the most common laptop problems. In most cases the LCD display inverter is the cause of the problem.
Here are some LCD screen backlight failure symptoms that could be related to a bad inverter board:
- Laptop boots as usual but after some time the screen blacks out. You still can see an image on the screen but it’s very dim. You might even use a flashlight to see it better. Sometimes the backlight comes back for a while but then goes off again. In some cases you can turn the backlight on if you tap rapidly on the lid close switch.
- The screen always stay black and the backlight never comes on but you still can make out an image on the LCD. It’s dark, but the image is still there.
-In some cases you might hear a buzzing noise coming from the area where the inverter board is located, it’s on the bottom part of the display assembly.
NOTE: if you cannot see an image on the screen, most likely you have a different problem and there is nothing wrong with the display inverter.
In this posting, I describe an example of replacing the display inverter board on an HP Pavilion laptop. This guide will work fine for any other HP laptop. Replacing a display inverter on other laptops like Dell, Toshiba, IBM, etc… will not be much different.
System Information
The laptop that I replaced the display inverter is a HP Pavilion dv5-1002nr, running Windows Vista Home Premium Edition (32-bit). [As shown above.]
Display Description
15.4-inch WXGA Brightview display assembly [HP Spare Part Number: 484367-001]
Preliminary replacement requirements
The following sections include some of the considerations that you must keep in mind during disassembly and assembly procedures.
Tools required
You will need the following tools to complete the removal and replacement procedures:
● Magnetic screwdriver
● Phillips P0 and P1 screwdrivers
● Flat-bladed screwdriver
Service considerations
NOTE: As you remove each subassembly from the computer, place the subassembly (and all accompanying screws) away from the work area to prevent damage.
Cables and connectors
CAUTION: When servicing the computer, be sure that cables are placed in their proper locations during the reassembly process. Improper cable placement can damage the computer.
Preliminary Safety Instructions
Before locating, removing and replacing LCD inverter, follow these steps:
1. Shut down the computer. If you are unsure whether the computer is off or in Hibernation, turn the laptop on, and then shut it down through the operating system.
2. Disconnect all external devices connected to the computer.
3. Disconnect the power from the computer by first unplugging the power cord from the AC outlet and then unplugging the AC adapter from the computer.
4. Remove the battery.
 Figure 1
a) Turn the computer upside down on a flat surface. [See Figure 1 above.]
b) Slide the battery release latch (1) to release the battery.
c) Pivot the battery (2) upward and remove it (3) from the computer.
d) To insert the battery, insert the rear edge of the battery into the battery bay and pivot the front edge of the battery downward until it is seated. The battery release latch automatically locks the battery into place.
LCD Inverter Replacement Steps
1. Remove the Switch Cover.
 Figure 2
a) Position the computer with the front toward you.
b) Remove the following screws [See Figure 2 above.]:
(1) Two Phillips PM2.5×7.0 screws that secure the switch cover to the computer
(2) Three Phillips PM2.0×4.0 screws that secure the switch cover to the computer.
 Figure 3
d) Open the computer as far as possible. [See Figure 3 above.]
e) Lift the rear edge of the switch cover (1) until it detaches from the computer.
f) Slide the switch cover (2) back until it rests on the display.
 Figure 4
2. Releasing the display assembly from the laptop. [See Figure 4 above.]
a) First, the switch cover should be positioned as far from the display assembly as allowed by the cables connected to the switch cover. This will allow access to screws connecting the display assembly to the laptop.
b) Remove the four Phillips PM2.5×7.0 screws (1) that secure the display assembly to the laptop.
c) Lift the display assembly as far away from the laptop as possibly allowed by the display cables (2).
 Figure 5
3. Removing the Display Bezel.
a) Remove the following screw covers and screws [See Figure 5 above]:
- Two rubber screw covers on the display bezel bottom edge (1).
- Two Phillips PM2.5×7.0 screws (2).
 Figure 6
b) Flex the inside edges of the top edge (1), the left and right sides (2), and the bottom edge of the display bezel (3) until the bezel disengages from the display enclosure. Remove the display bezel (4). [The display bezel is available using the HP Spare Part Number 486532-001.]
 Figure 7
4. Replacing the display inverter. [See Figure 7 above.]
a) If it is necessary to replace the display inverter, release the display inverter (1) as far from the display enclosure as far as the display panel cable and backlight cable allow.
b) Disconnect the display panel cable (2) and the backlight cable (3) from the display inverter.
c) Remove the display inverter. [The display inverter is available from HP using Spare Part Number 488317-001.]
Below is a picture of the replacement display inverter. The image shows both sides of inverter.

5. Inserting the new LCD inverter.
a) Connect the display panel cable and the backlight cable to the display inverter.
b) Reverse steps 1-4 above in order to complete the inverter replacement.
c) As a final step, connect the battery and power cables to the laptop and power up the laptop.
Note: If all the steps were successful, then the LCD display should now be functioning correctly.
___
Subscribe to:
Comments (Atom)


